Monday, October 15, 2012

Handmade 52: #12- Redneck Sprinkler!

"Redneck" Sprinkler

I found this idea on Pinterest!
Original Sprinkler Pin on Pinterest

With Little Man's first birthday (sniff) fast approaching I asked hubby to see if anyone at work had two empty 2-liter soda bottles for us. Why two? Well, I often make mistakes the first time I do things, and I didn't want to risk being without a sprinkler on the big day. It's really hot in Texas in May, and several big kids getting hot and bored at a baby's birthday party would never be a good thing!

I bought a male-to-male brass fitting at the hardware store (about $6 in the plumbing department - if you can't find it then ask someone, I had to ;) ) to attach to the end of the hose...and then I went to town on the empty bottle the with my drill! Weeee!

Several holes, a little bit of wrangling the soda bottle to get it to screw into the brass fitting correctly, hubby daringly climbing the itty bitty tree branch to get it into the right spot, and this is how it worked:

From this shot you can get a rough idea of where I decided to make the holes in the bottle.
Don't stress out and measure, I definitely didn't!

The water pressure was up quite high for this photo.
It made it lovely wide sprinkler, but it was still easy for the kids to get drenched!

The great thing is once you're done playing with it, you can unscrew it from the hose, let it dry, put it away and use it again! But what if it gets trampled on by the children and you can't salvage it? Why, simply recycle it and drill holes in a new one! Don't forget to remove and store the brass fitting before you recycle the bottle.

Our children have accidently broken several really good lawn sprinklers by stepping on them in the middle of their fun, and not even realizing until the spray arm no longer moved. Now I'll save those for the lawn, and use this one when they are playing outside and need to cool down. :)

If you're like us and very seldom buy 2 liter sodas, then don't forget to ask at work / neighbours to see if they  can give you an empty one!

Actually, one of the neighbours saw our sprinkler over the top of our privacy fence and loved the idea so much that he asked us to tell him how to make his own! Isn't that great?!

Saturday, October 13, 2012

Handmade 52: Items #10 & #11 - PJs Full Of Love

PJs Full Of Love

A few MONTHS ago I cut out a couple pairs of Lazy Days Lounge Set jammies for Missy. And a couple weeks ago I finally got them all sewn up. *hiding from shame* I haven't been the best as finishing UFOs (Unfinished Objects) this past year or so, and I am determined to fix that!

Funnily, Missy is into more and more 5T clothing at the stores because they are always short and tight. But Fishsticks Designs patterns always seem to have enough room to grow and move around, without me having to size up. I love that. Not only does that mean I waste less time trying to figure out how on earth to lengthen  pattern pieces* without messing up the shape, but it means that I get more use out of her patterns over the years and through sizes, than we get use from store clothes. Don't get me wrong, the majority of her clothes are bought. I simply don't have the time YET to sew the majority myself. Let's hope she still loves "mommy-made" by the time I have more free time to sew regularly!

*I know most people can lengthen / alter patterns easily, especially for children. However, I simply do not have this gift! It's a major upheaval and headache for me to alter a pattern, which means that if I have to do it  I will probably never use the pattern. *more shame*

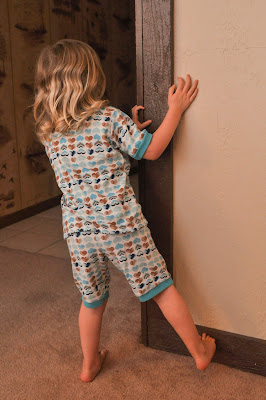
Missy loves her little ballerinas!

I usually use a solid color for the back. It's stretchier than the jersey I use on the front and  that makes it nice and snuggly at night.

A super adorable bird's nest tag from Night Owl's Menagerie.

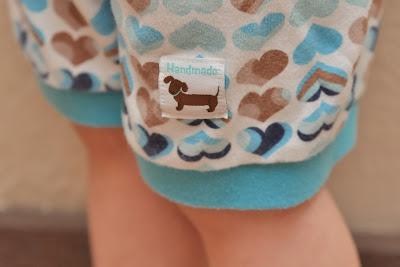
I just LOVE these hearts! Thankfully so does she!

Yup, you guessed it! Night Owl's Menagerie again! Nope, I don't think my addiction is a problem ... just wait until you see all the cute ones I have, lol!


This interlock is lovely, soft, and has a nice weight to it. So it was great to use for the back  as well. 

As you can see, most of the time I pair my cute knits with a solid, and most of the time it's from JoAnn Stores, bought with a 40% or 50% off coupon. Sorry JA, I refuse to pay full price. ;) The blue solid is a knit interlock, and the purple in the jammies above, is a cotton/spandex rib knit. Almost all the rib knit you see me use has spandex in it. It bounces back better and survives many, many, washes better than the rib knit without it.

Little Man was determined to have in on the photo shoot but we kept moving him out of the way. So he started blocking the camera with his cute face and smacking it! Don't worry he was laughing not throwing a fit. What else is a mama to do, but capture that gleeful "I just got your camera, Mom!" face! Love you sweetie pie!

Thursday, October 11, 2012

Handmade 52: Item #9 Chicken Coop!

It is DONE!!!
Phew! It took me over 3 months and far more cash than planned to build this coop. Oops.

Coop shown with flaps open.
The brown you see inside near the center is a tall cardboard box I used to section off some of the coop, so that the little chicks would be in a smaller area inside the coop to start with. This came in handy when Buttercup needed to be separated from the rest during the "Broken Beak" episode. o_O
More on that and her recovery soon.


Note to self : Use a plan (bought or free) that comes with a cut list and step by step instructions, and remember that you don't have the spare time to make elaborate things during nap times - less is more!

Chicken Coop and Run

  • Our coop is taller than my husband! 
  • It consists of a 6ft x 3ft coop on top, and a 6ft x 4ft run below. 
  • There is a 2 section ladder for them to go up to the coop and down to the run. They enter / exit the coop via a pop-door in the floor. 
  • I used hardware cloth over the windows and run sides. We do NOT want to take the risk of anything hurting or taking off with our little ladies, so I tried to make the coop and run as secure as possible. But I also made as many doors and windows as possible. It gets VERY hot here in Texas, and the last thing I wanted was for our chickens to overheat and die....and then I'd have to tell the kids what happened. Nope, not our kind of fun. So lots of windows to open for airflow, while still keeping them secure, and lots of doors so that I can easily clean it out, reach food and water, catch chicks that need medical attention, allow the kids to feed treats without them escaping, and so on.
  • Thankfully I thought ahead and put together the whole thing with good quality screws, because the only way I see us being able to move it / sell it off if we move....is in pieces or at least in sections. It is huge, heavy, and strong enough to hold an adult or several kids in the top section without it even moving. I'm pretty proud of it's strength and security features! ;)
(I'll do a separate post with more photos of the building process, inside details etc.)

Our girls are:
Buttercup (Blue Splash Marans - standard size chicken)
Izzy (Black Australorp - standard size chicken)
- named after Isabella on the TV show Phineas and Ferb
Millie (Welsummer - bantam chicken)
and
Meep (Black Frizzle Cochin - bantam chicken)
- named after the cute alien character in Phineas and Ferb.

I'll do a separate post showing off our beauties!
Okay, okay, one sneak peek:
They're MUCH bigger these days!


Where did we get our chickens?
After much deliberation, lots of emails back and forth between myself and several people, I made the executive decision to order our girls from My Pet Chicken.

Why?
For so many reasons. The main ones being:
  1. We had to be sure we received girls. Our landlord sweetly said yes to our out-of-the-blue request for chickens in this suburban neighbourhood, but we promised them no roosters would ever call our coop home. Unlike most places, MPC sexes their bantams. Yes, there is always a small chance they will get it wrong, but the chances are far lower than ordering through the feed store, or on Craigslist, and simply taking our chances with what sexes we receive for our bantams.
  2. We could get a variety of breeds without having to reach a minimum of 15+ chickens. We are allowed no more than 4 and to be honest, that's plenty for us. For our zipcode, the minimum order is 5 when you order bantams and standards in one order. Thankfully I know a sweet lady nearby that would add to her flock so that we would meet the minimum. Yay!

This is by far the biggest handmade item that I will tackle this year (thankfully). And while it's certainly not perfect, especially up close, it is fully functional and I'll admit I'm pretty impressed that I did the majority of it without help! Though the help I did receive from my husband was invaluable. I could never have finished certain areas like the roof, without his strength, height, and all-round awesomeness. Thanks Handsome! ;)

Tuesday, October 9, 2012

Handmade 52 Items #7 and #8: Marvin Goes To Mars

I realized the other day that Little Man has been a bit neglected, being the third child that he is. He had been using one of our pillow cases on his pillow, and when I put it in the wash the other day I realized I didn't have a single spare one to replace it with. Mmmm....what else is a sewing mama to do but sew him some! :)

A while ago, oh I guess about a year or so, I stumbled across some super cute fabric on www.fabric.com . A line called "Marvin Goes To Mars". I grabbed a bunch of it with the plan to make a quilt and pillow case set for JBug (aka Booger), possibly even add some trim to a bought sheet set to go with it. But these days he's more into Iron Man than cute little aliens and boys in rocket ships.
Thankfully we have another son, one who happens to be in desperate need of bedding. And wouldn't you know it? I just happen to have a stash of super cute fabric, just begging to be used! Win!  ;)

See having a fabric stash really IS useful!

Now comes the fact that I don't think I've sewn a pillow case in YEARS...possibly since the throw pillow covers of my Home Ec classes in school! Ha ha!

Never fear, I know just the tutorial for the job. Enter the Fishsticks Designs, 9 1/2 Minute Pillowcase Tutorial!

And yes it really is that easy. See for yourself:

Two adorable pillowcases done in record time!
Please ignore the fact that the top one is wrinkly and needs a wash - I couldn't very well force my sick baby to wait for his pillowcase until after I had taken photos. So just pretend it's all cleaned and ironed, ok? ;)

And great timing too. Once they were done a sick Little Man I know was contemplating a nap, and was oh so eager to lie down on his new pillowcase, on Mommy's lap, for a nap. Awww, too cute!
Poor tired guy.

Of course that means Mommy had to wrangle said (30lb) baby, and his newly covered pillow, all the way back to his bed, and get them both in and down without waking up Little Man. Thankfully watching Mission Impossible paid off, and together with my USMC hubby's stealth training, it ensured nap time was a go!

Oh and did you see the tags I used?
Night Owl's Menagerie tags - they're woven and foldover.

They're a foldover tag with "Handmade" on the one side and a cute heart lock on the other. They're designed and sold by Night Owl's Menagerie on Etsy. You also need to see the amazing creations she has available for you on Zazzle.
I can't say enough about her talent...I wish I could design beautiful things like she does. However, my Grandmother's artistic talent was NOT passed on to me, and so even my stick figures run in terror from their reflections, ha ha ha!
I'm not kidding...sadly.

Those are not affiliate links. I simply want to give credit where credit is due. And I also want to make sure everyone can enjoy her crafty goodness. I could write an entire post on my woven / satin tag addiction - in fact I might - but for now I simply want to pass on my love of tags!

This site was made with love by Angie Makes